Zeroing a rifle — the complete guide
What zeroing actually is, how to choose the distance, how many shots a trustworthy correction takes and how to turn it into clicks. With zeroing on a range shorter than your target distance, the pointMoA targets and the ballistic calculator.
Zeroing — sighting in, in other words — means setting the sights so that the point of aim and the point of impact meet at a chosen distance. The definition is trivial. The practice is not, because underneath that one sentence sit three questions that deserve a deliberate answer: at what distance, from how many shots, and how to compute the correction so that you do not spend the afternoon chasing your own tail.
This article is not a set of instructions for zeroing at 100 m. A hundred metres is one sensible choice among several, and not always the best one. It is instead an explanation of how zeroing works — from the geometry, through the statistics, to writing the result down — so that the choice of distance stops being a matter of range tradition and becomes a decision that follows from what you actually do with the rifle.
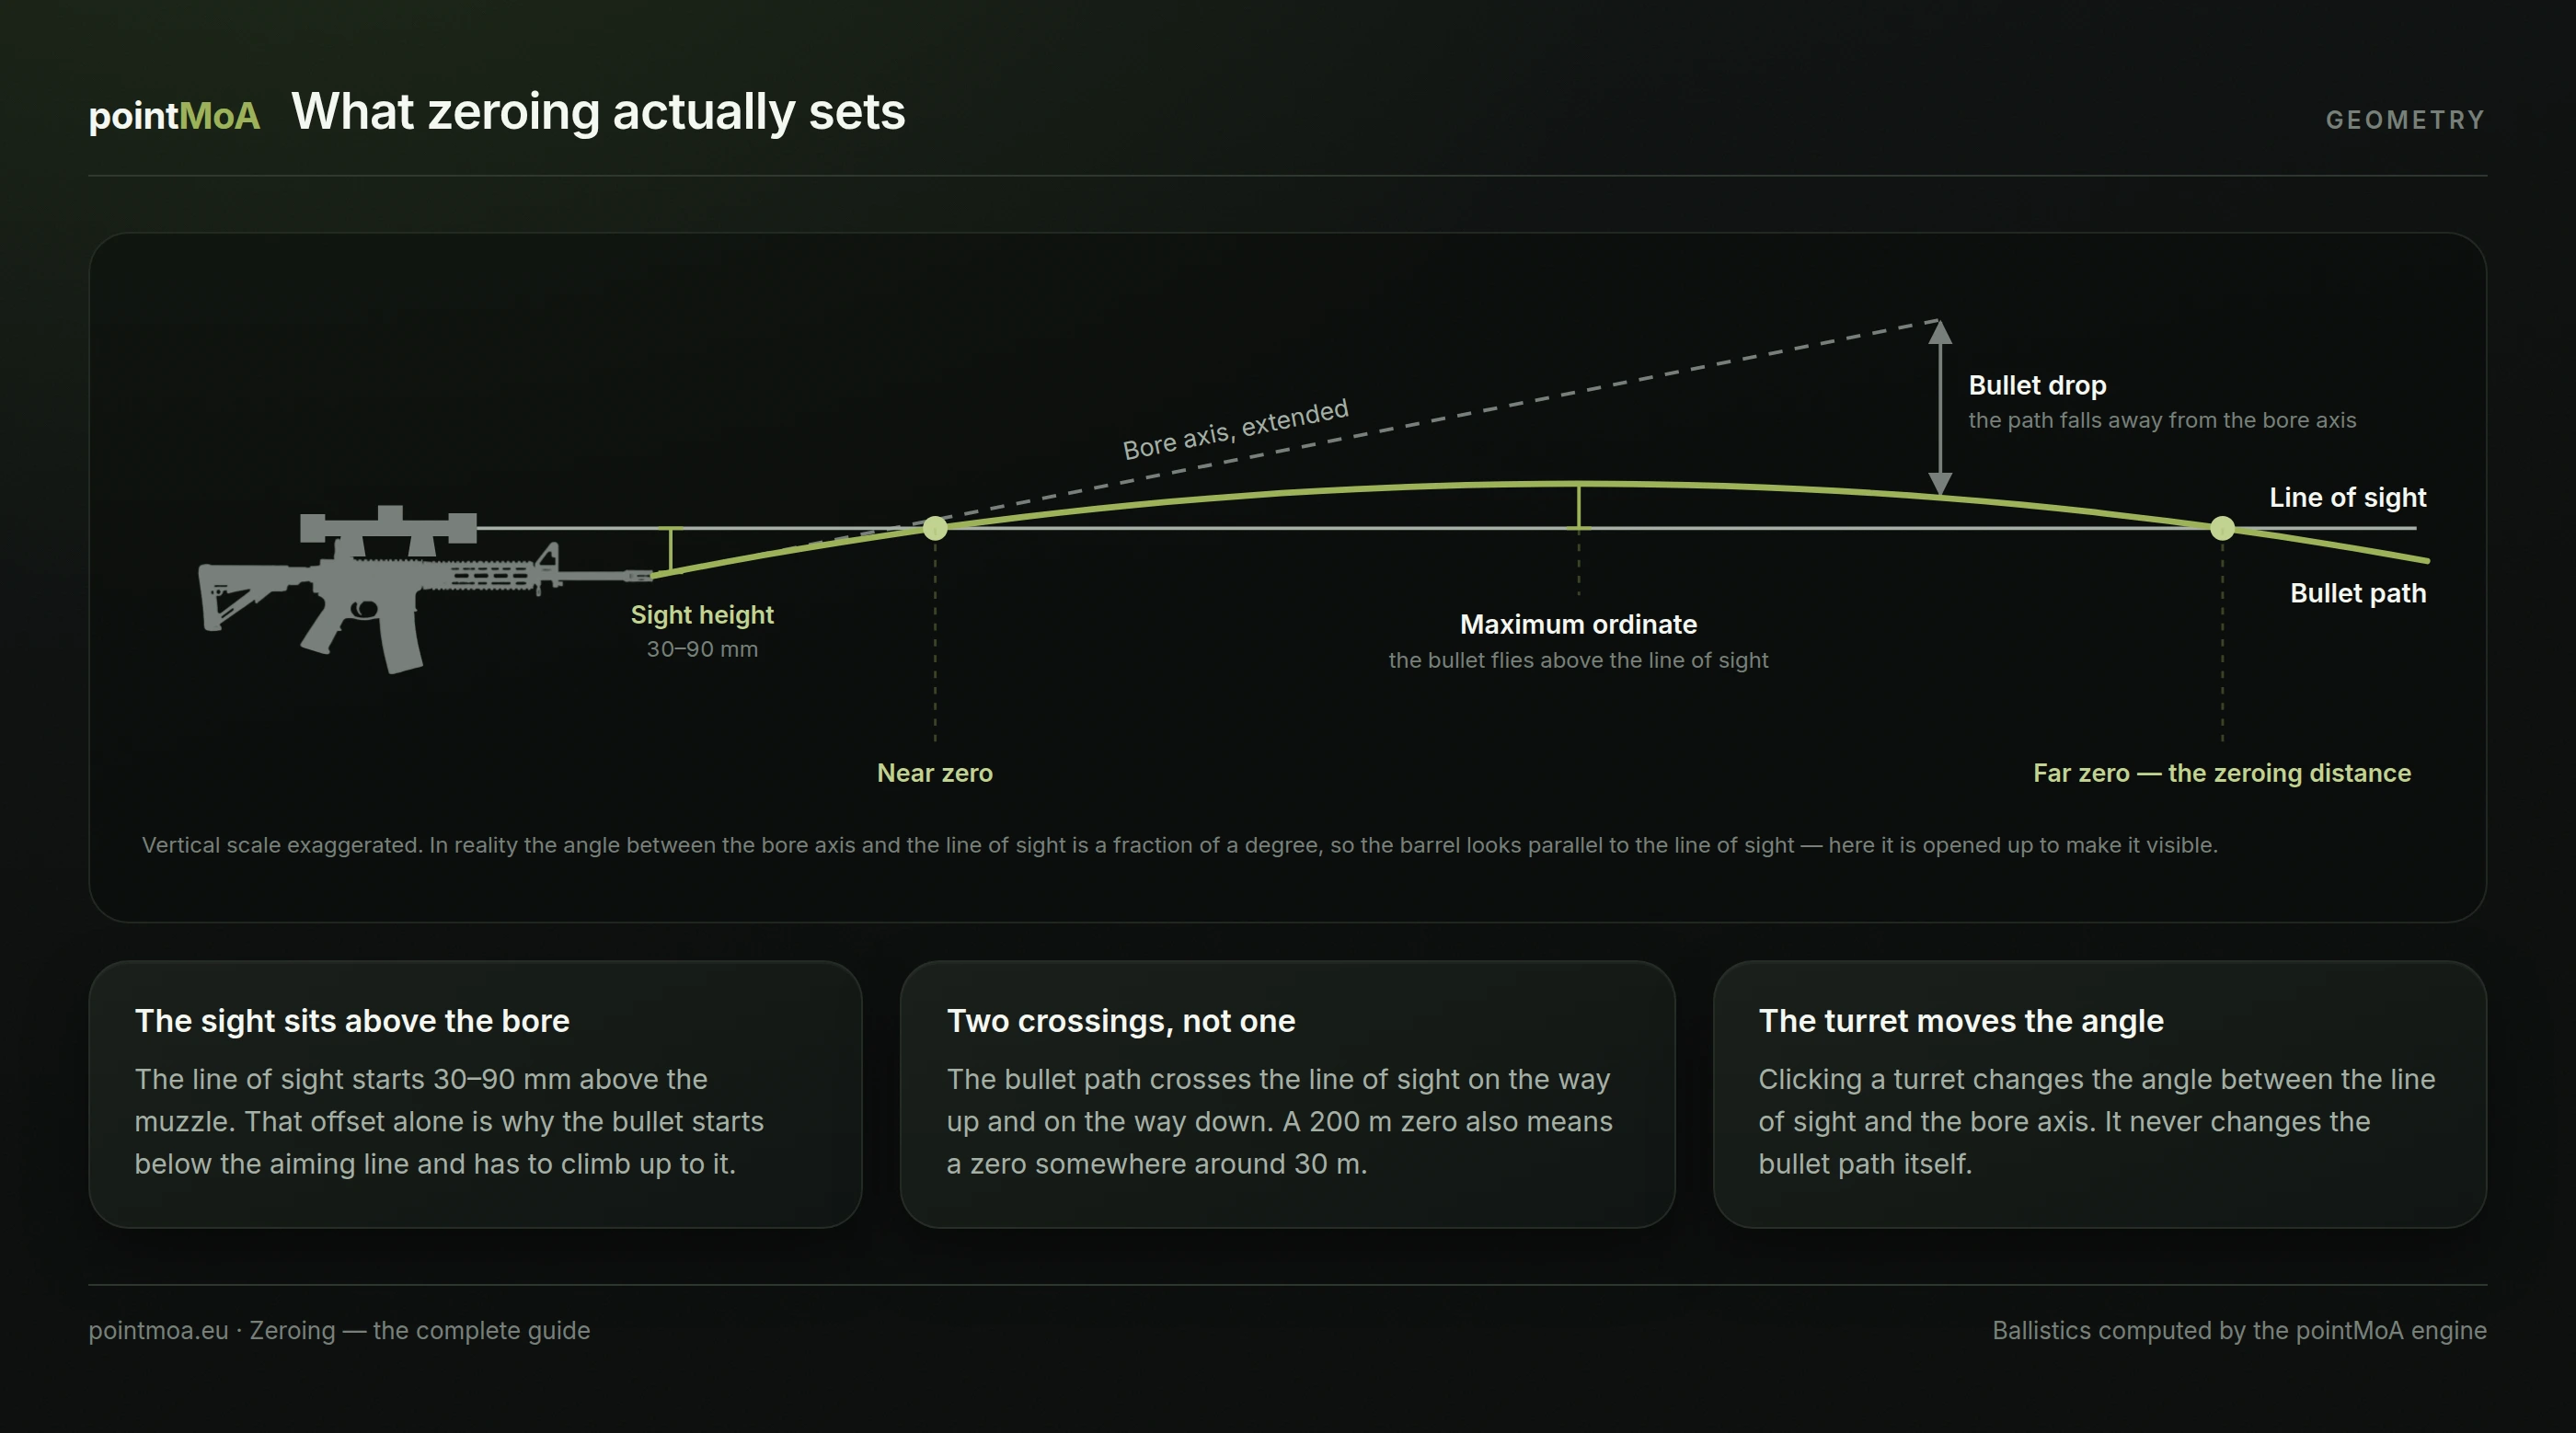
What you actually set when you turn a turret
The scope does not change the bullet path. Turning a turret changes the angle between the line of sight and the bore axis — and nothing else.
Three lines meet in a shooting setup:
- The bore axis — the direction in which the bullet leaves the rifle.
- The line of sight — a straight line from your eye through the sights to the target. It runs above the bore, because the optic sits above the barrel. That offset is called sight height (height over bore, HOB) and usually runs from 30 mm on a classic hunting rifle to 70–90 mm on a carbine with a rail and a raised mount.
- The bullet path — a curve, because from the muzzle onwards the bullet is subject to gravity and air drag.
Since the bullet starts below the line of sight and has to cross it at some point, the barrel must point slightly upwards relative to that line. The bullet path therefore rises relative to the line of sight, crosses it, passes above it and falls back down. Which gives the fact that surprises people most often:
The bullet path crosses the line of sight twice. The first crossing is the near zero, the second is the far zero. Zeroing "at 200 m" also means a zero somewhere around 30 m.
Between the crossings the bullet flies above the line of sight. The highest point of that difference is called the maximum ordinate, and it is what decides whether a given zero is usable with a dead-centre hold.
For the record: sight height does not change the ballistics of the bullet, but it does change the geometry — and therefore where both zeros fall. The same load and the same zeroing distance on two rifles with different mount heights give a different path at short range:
| Sight height | 25 m | 50 m | 100 m | 300 m |
|---|---|---|---|---|
| 30 mm | −0.6 cm | +0.7 cm | 0 | −54.4 cm |
| 50 mm | −2.1 cm | −0.3 cm | 0 | −50.4 cm |
| 90 mm | −5.1 cm | −2.3 cm | 0 | −42.4 cm |
The same .308 Winchester 168 gr load at 780 m/s, G7 0.243, zeroed at 100 m. Values computed with the pointMoA ballistic engine.
The practical conclusion: sight height is an input, not a mounting detail. A calculator that does not ask for it cannot compute short range.
The zeroing distance is a choice, not a constant
Same load, same rifle, same scope — the only thing that changes is the distance at which the zero was set. Everything below was computed with the pointMoA ballistic engine for .308 Winchester 168 gr at 780 m/s (G7 0.243, sight height 50 mm, standard conditions):
| Zeroing distance | 25 m | 50 m | 100 m | 200 m | 300 m | Maximum ordinate |
|---|---|---|---|---|---|---|
| 100 m | −2.1 cm | −0.3 cm | 0 | −14.0 cm | −50.4 cm | +0.4 cm @ 79 m |
| 200 m | −0.4 cm | +3.2 cm | +7.0 cm | 0 | −29.4 cm | +7.2 cm @ 116 m |
| 250 m | +0.8 cm | +5.5 cm | +11.7 cm | +9.3 cm | −15.4 cm | +13.2 cm @ 139 m |
| 300 m | +2.1 cm | +8.1 cm | +16.8 cm | +19.6 cm | 0 | +21.0 cm @ 164 m |
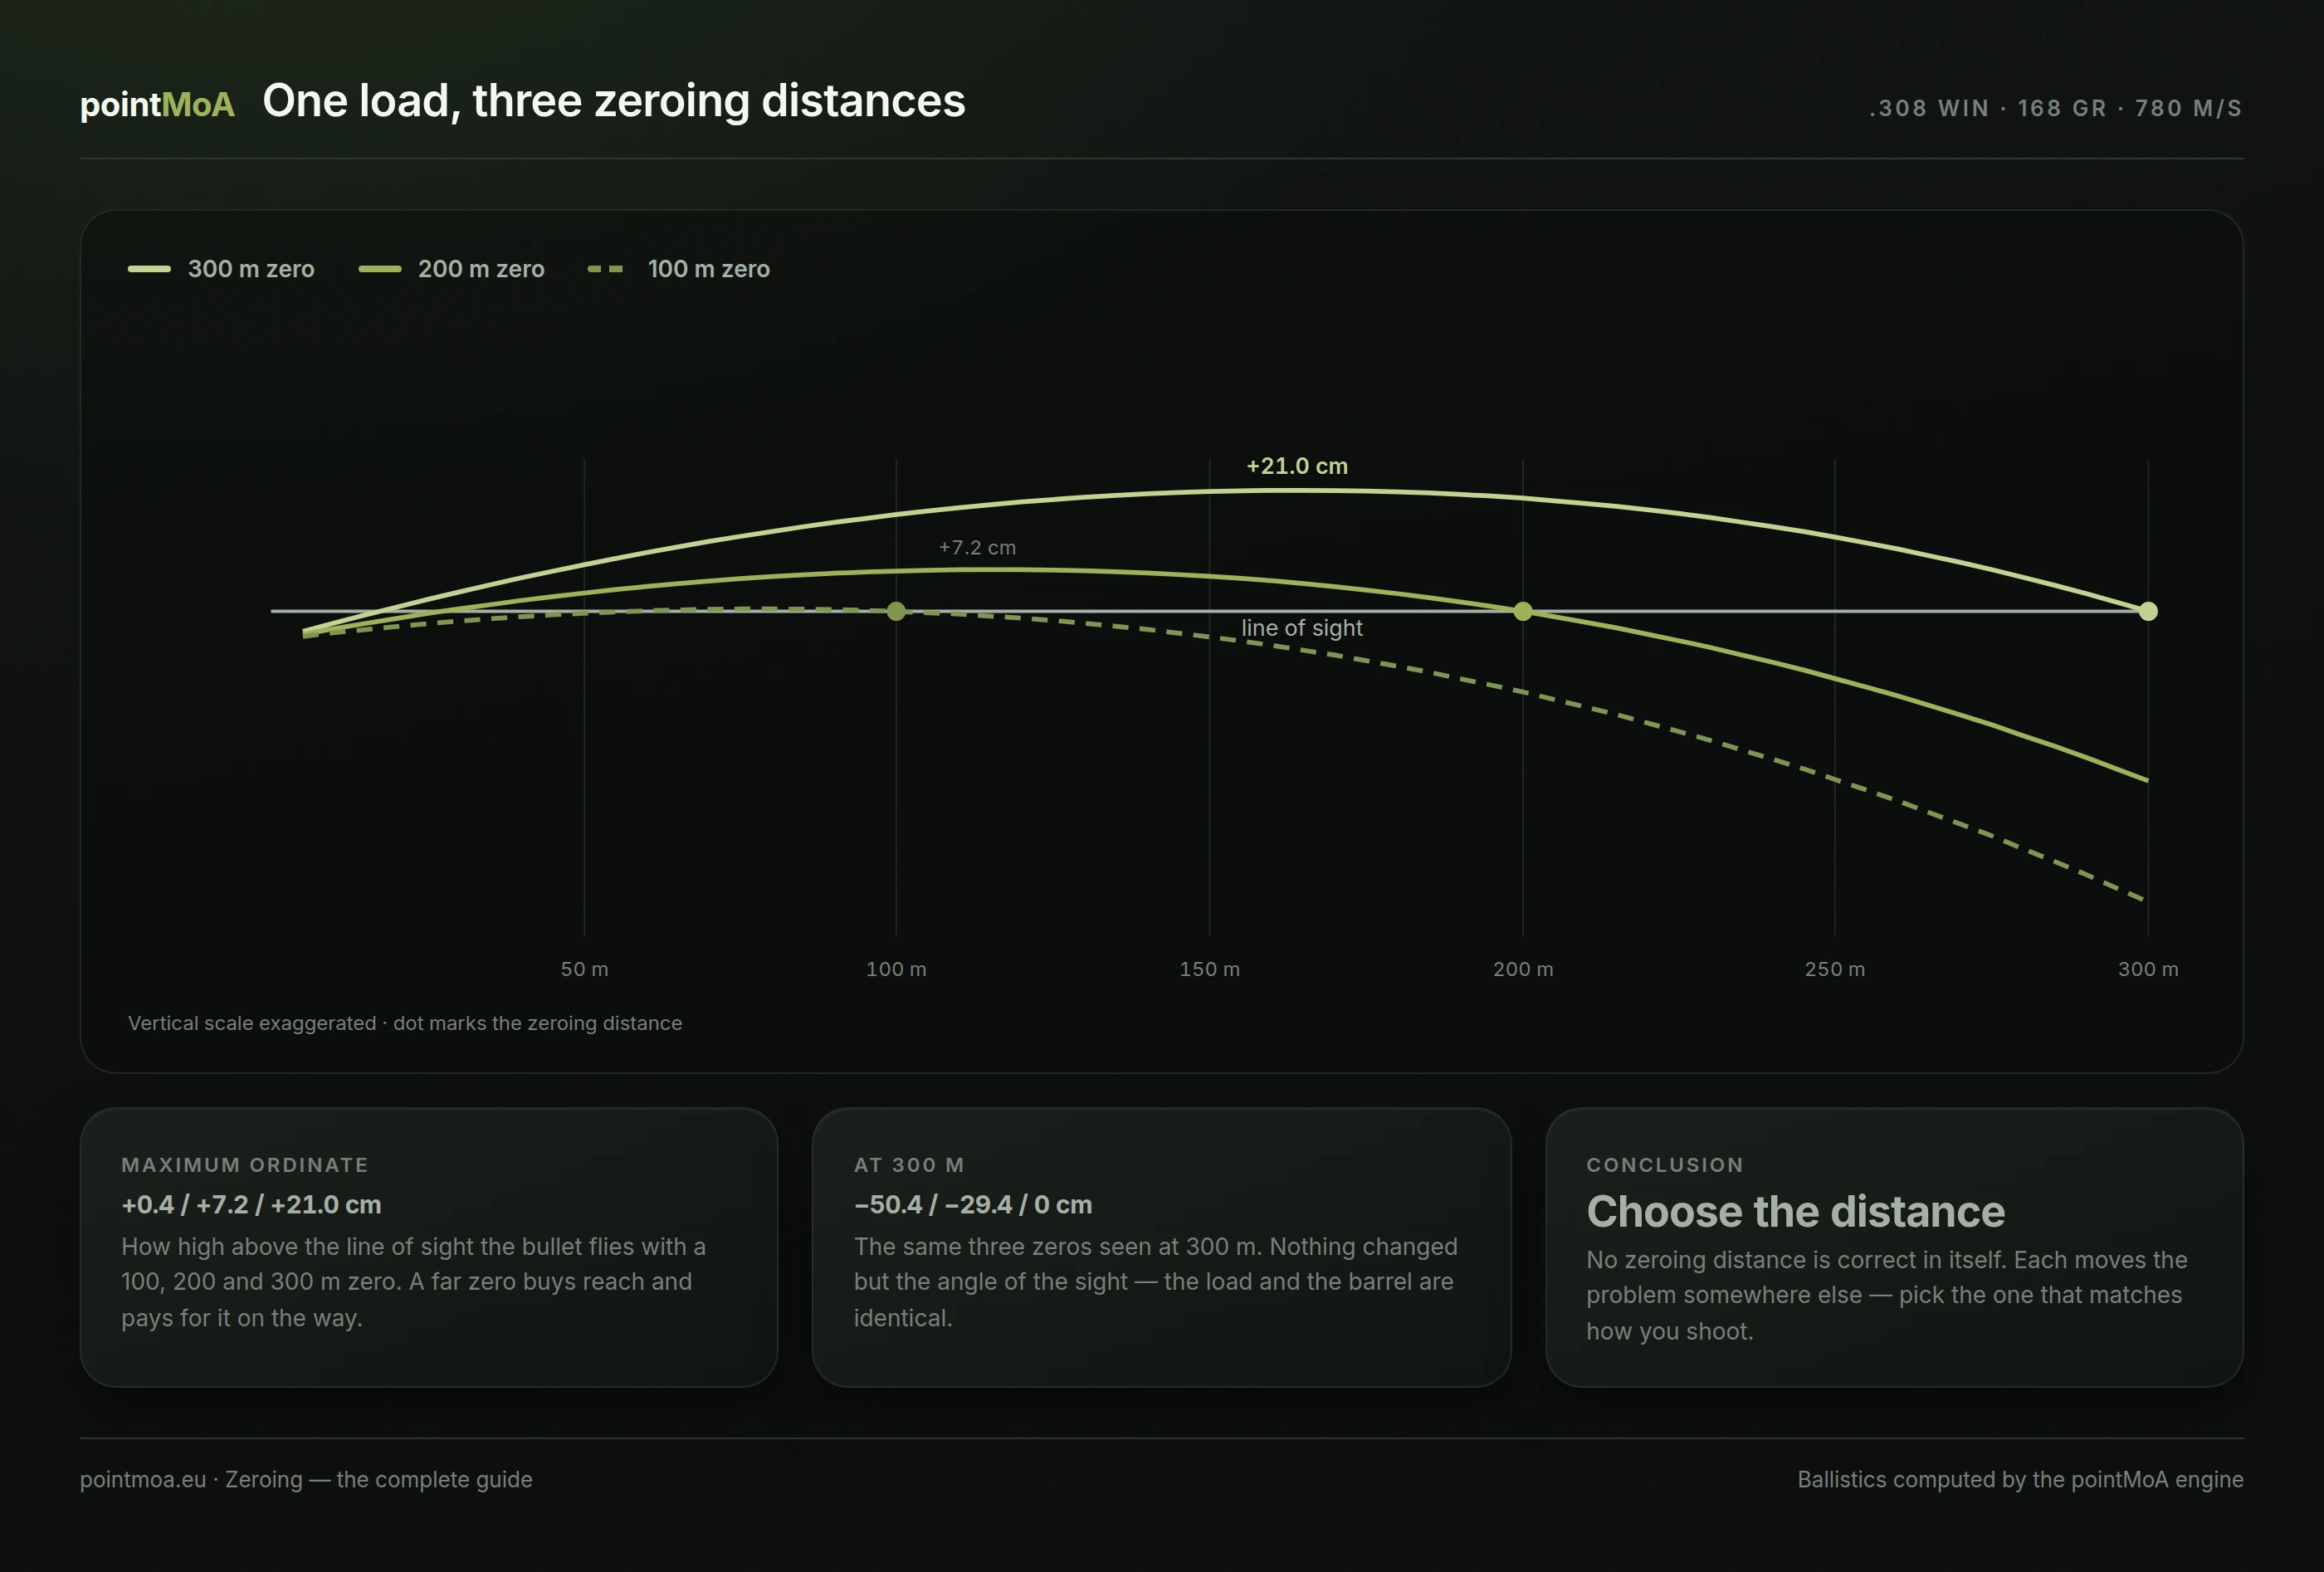
Two things follow. First, no distance is correct by definition — each one moves the problem somewhere else. Second, with a 100 m zero the maximum ordinate is 4 mm; with a 300 m zero it is 21 cm. That is no longer a detail; that is a miss on a small target.
When to zero at 100 m
A hundred metres is a good choice when you are going to dial anyway, or hold on the reticle: precision shooting, long range, testing loads and rifles.
The advantages are concrete: a short time of flight, so wind and conditions barely affect the measurement itself; convenient arithmetic (1 MRAD = 10 cm, 1 MOA = 2.91 cm); and the fact that most tables, manufacturer data and ready-made trajectories are quoted from that distance. The maximum ordinate is practically zero, so you never have to remember that the bullet goes high somewhere along the way.
When to zero further out — the hit window
Hunting and general-purpose use asks a different question. Not "how precisely can I hit the target", but "how far can I hold dead centre and still land inside the zone I care about". That distance has a name of its own: maximum point blank range (MPBR).
The rule is simple. Choose the height of the window — say 15 cm, that is ±7.5 cm around the point of aim. Set the zeroing distance so that the maximum ordinate just touches the top edge of the window. The MPBR is the distance at which the bullet drops below the bottom edge.
For the same .308 168 gr at 780 m/s that gives (pointMoA engine):
| Hit window | Zeroing distance | Maximum ordinate | MPBR |
|---|---|---|---|
| ±7.5 cm | 202 m | +7.4 cm @ 117 m | 236 m |
| ±10 cm | 225 m | +10.0 cm @ 127 m | 263 m |
For a 5.56 × 45 carbine (62 gr, 900 m/s, G7 0.151, sight height 70 mm) the same criteria give a 228 m zero and a 263 m MPBR with a ±7.5 cm window.
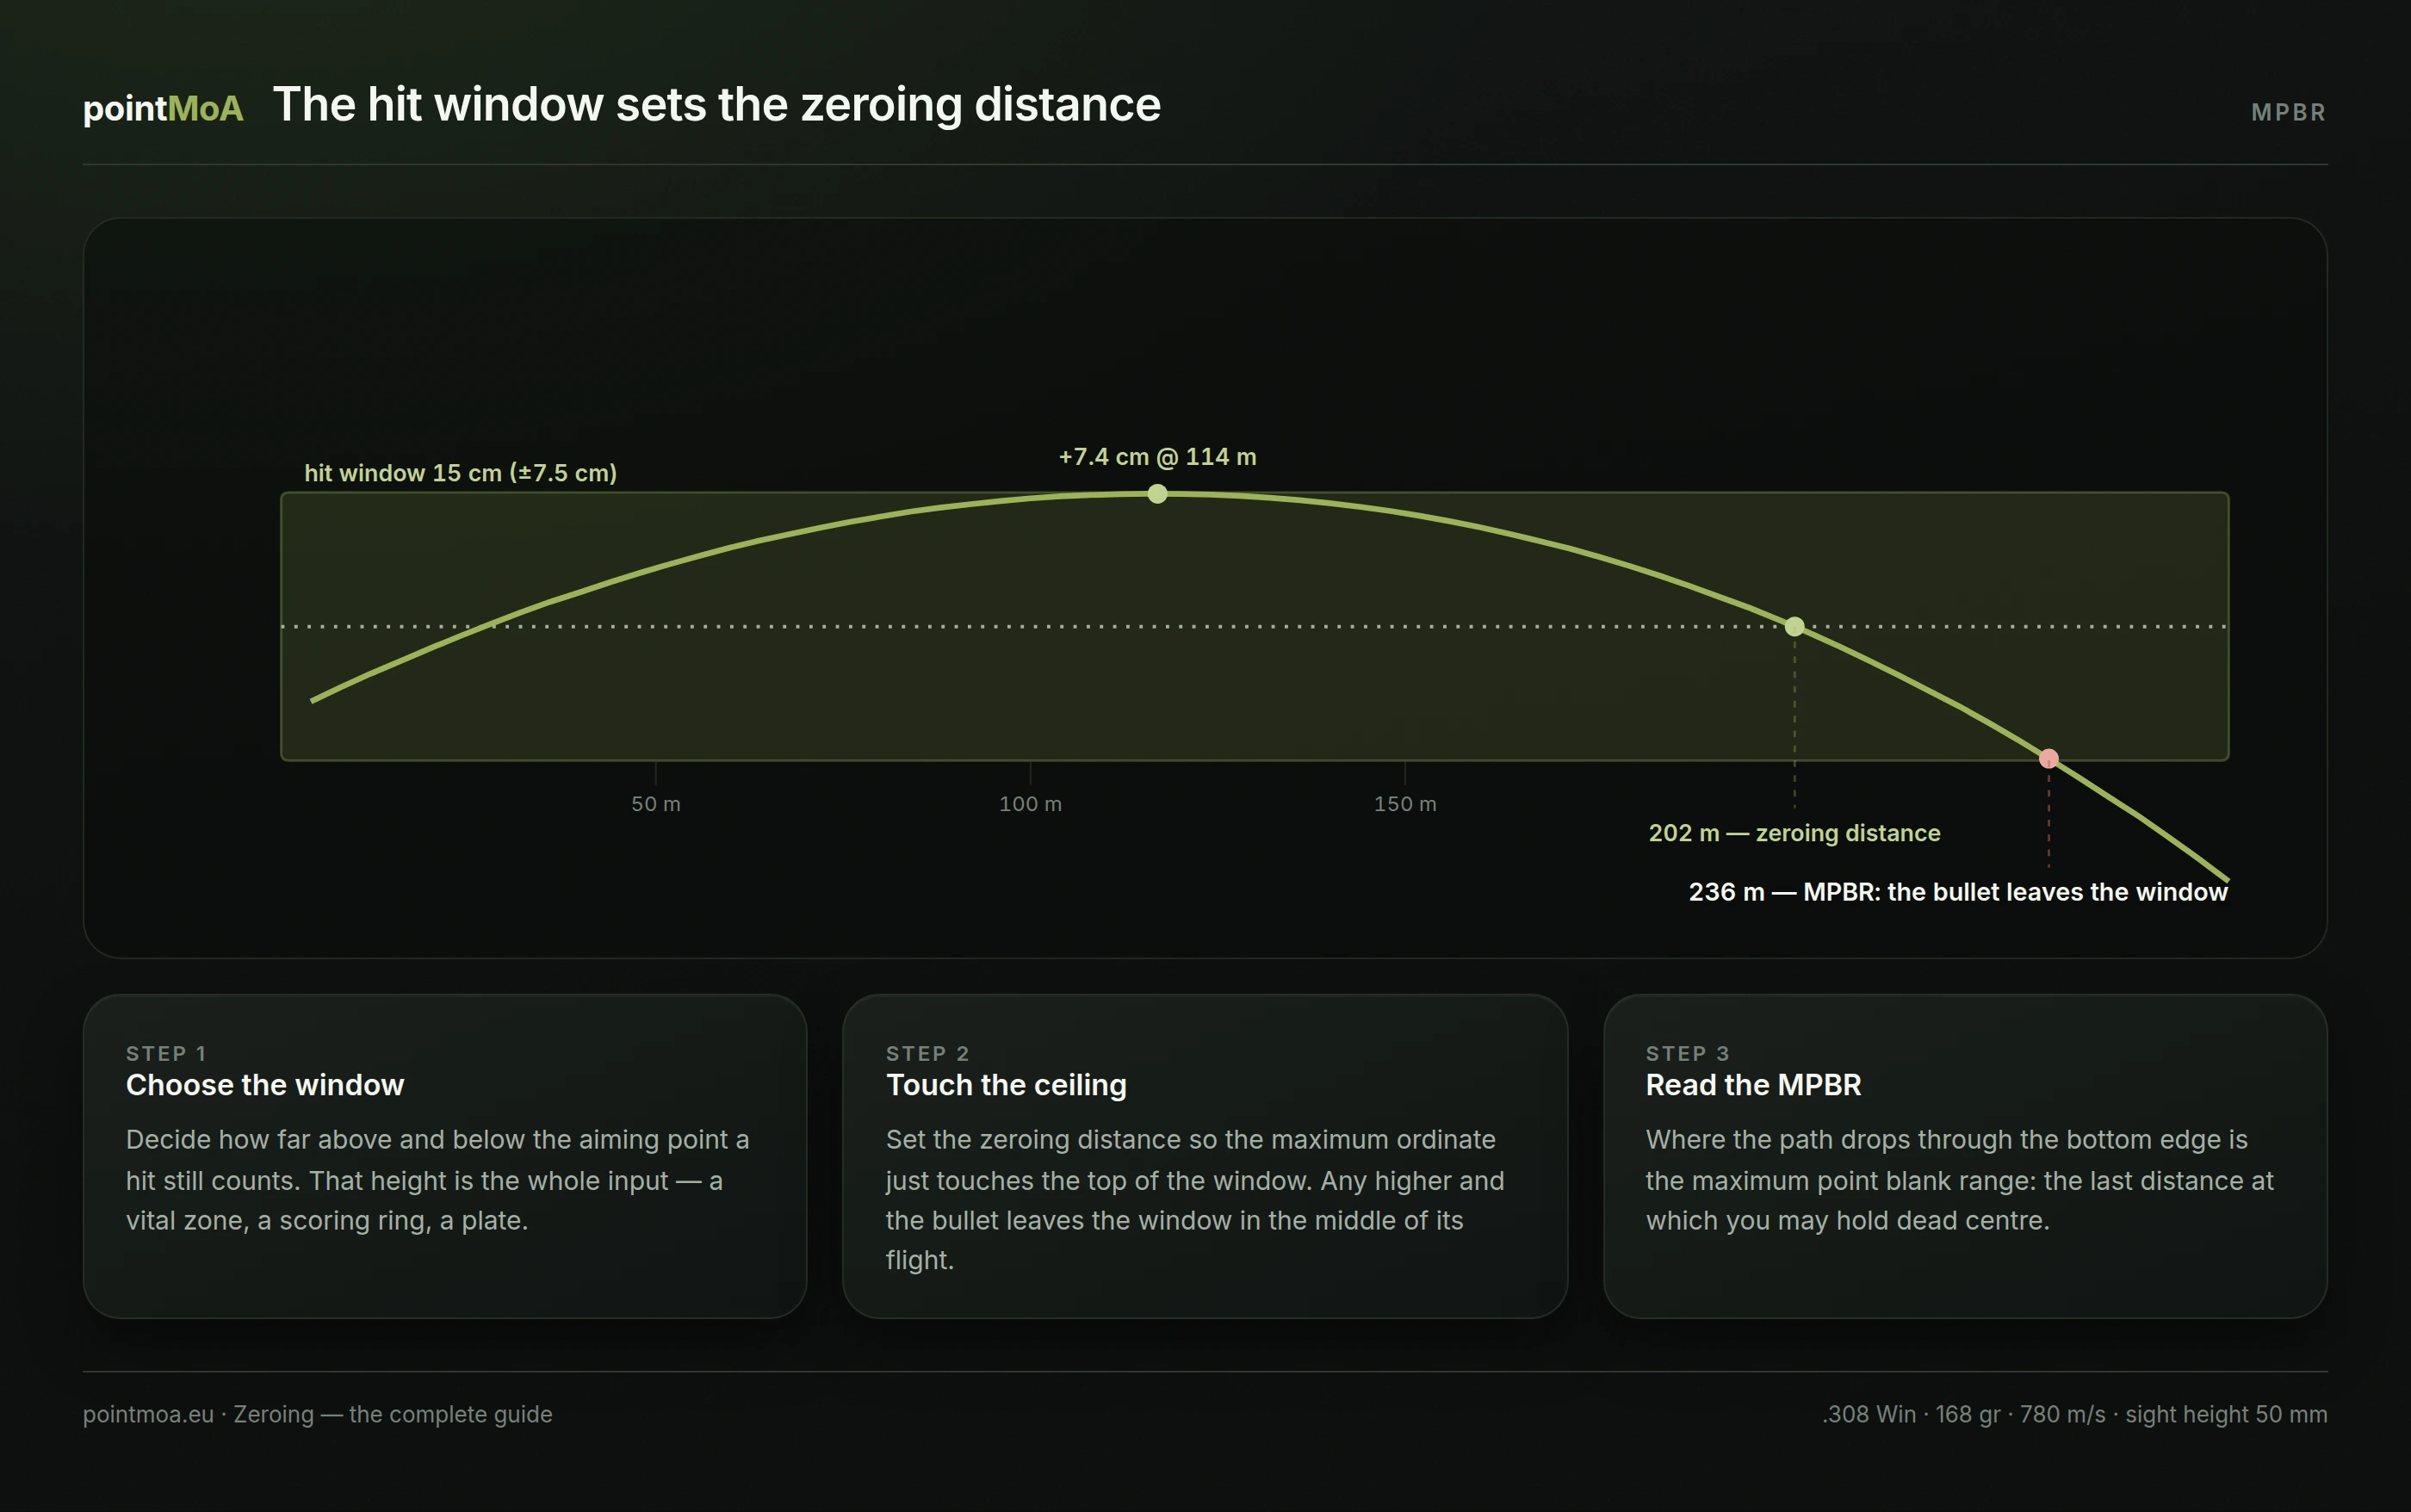
That is the whole point of "zeroing further out": it is not about a flat trajectory, it is about the range over which you need to do nothing with the sight. There is one condition — you have to know where the path runs on the way. A 300 m zero taken on a 150 m shot puts the bullet 21 cm above the point of aim, which is a miss over the back on a shot nobody would expect to miss.
Deliberately short zeros
A separate family of choices puts the zero deliberately close so that the far zero lands where it is needed:
- 50/200 — the carbine classic. In the example above, the 5.56 zeroed at 200 m has its near zero at 47 m, so the two can be used interchangeably. Convenient, because 50 m fits on any range.
- 25/300 — the military scheme. The US Army's TC 3-22.9 describes zeroing a carbine at 25 m with the sight set for 300 m; the 5.56 trajectory brings the path back to the line of sight around 300 m. What matters to the military is that one setting covers the whole practical range of fire while the training range is 25 m long.
- .22 LR at 50 m — at subsonic velocity and a low ballistic coefficient the drop grows so fast that a 100 m zero puts the maximum ordinate high above the line of sight. Fifty metres is the natural distance here.
- A red dot on a handgun — 15–25 m, because that is the realistic range of use, and the sight height can be a bigger factor than everything else put together.
The warning that saves the most ammunition: zeroing on a short range amplifies every error. One centimetre of error at 25 m is 0.4 MRAD, which is 12 cm at 300 m. The same centimetre at 100 m is 0.1 MRAD, which is 3 cm at 300 m. A short range is convenient, but it demands more care, not less.
Before you go to the range
Half of all failed zeroing sessions come down to something you could have checked at home.
Check the mount. A loose rail or loose rings invalidate all the rest of the work. Torque the screws with a torque wrench to the figure the mount maker gives — "by feel" is the most common cause of a wandering point of impact. If the maker quotes torque separately for the rail and for the rings, those are not the same number.
Level the reticle. A canted scope does not matter at 100 m. Further out it starts to cost, because elevation dialled along a tilted axis introduces a horizontal component. The size of the error follows straight from the geometry: lateral shift ≈ drop × sin(cant angle). With 3 m of drop and 5° of cant that is about 26 cm sideways — on an aim that looks perfectly correct.
Prepare one lot of ammunition. Zeroing on one lot and shooting another means zeroing something you will not use. Write the lot number down; it will come back the next time you ask why the rifle suddenly shoots left.
Set the parallax and the reticle focus. Reticle focus against the sky first, then parallax for the distance you are shooting. Parallax does not move your zero by itself, but if you zero with a sloppy cheek weld and the parallax not set, you zero the parallax error into the rifle — and it comes back with every different head position.
Bore sight it first. On a rifle with a removable bolt: take the bolt out, rest the rifle solidly, look through the bore at a target 25–50 m away, and then — without moving the rifle — bring the reticle onto the same point. This is not zeroing; it is saving the first dozen shots, because without it the first group can miss the paper entirely.
Position: measure the rifle, not yourself
The rifle has to sit solidly and repeatably. Bags, a bipod with a rear bag, a rest — anything, as long as the position is the same every time and the rifle returns to the same place after recoil.
The most common mistake at this stage: judging the rifle's precision from a position that has more spread than the rifle does. Then you are measuring yourself, not the equipment — and feeding your own error into the zero as a permanent correction.
A few things that are easy to forget: the same cheek position on every shot, controlled breathing, a trigger press without a snatch, and cooling breaks between five-shot strings. A hot barrel can wander, and what you write down would then be the zero of a hot barrel.
How many shots make a zero
This is the part most often done wrong — not out of laziness, but from not knowing how the centre of a group behaves.
Every shot is a draw from a distribution. The centre of an n-shot group is not the true centre of the dispersion; it is somewhere near it, and the distance shrinks with the square root of the number of shots. The shooting statisticians at ShotStat (Ballistipedia) state it directly: the distance of a sighting group's centre from the true zero follows a Rayleigh distribution with parameter σ/√n, where σ describes the dispersion of the rifle.
In practice that means:
| Shots | Average zeroing error | With σ = 0.5 MOA at 100 m |
|---|---|---|
| 3 | 0.7 σ | about 1.0 cm |
| 5 | 0.6 σ | about 0.9 cm |
| 10 | 0.4 σ | about 0.6 cm |
| 20 | 0.3 σ | about 0.4 cm |
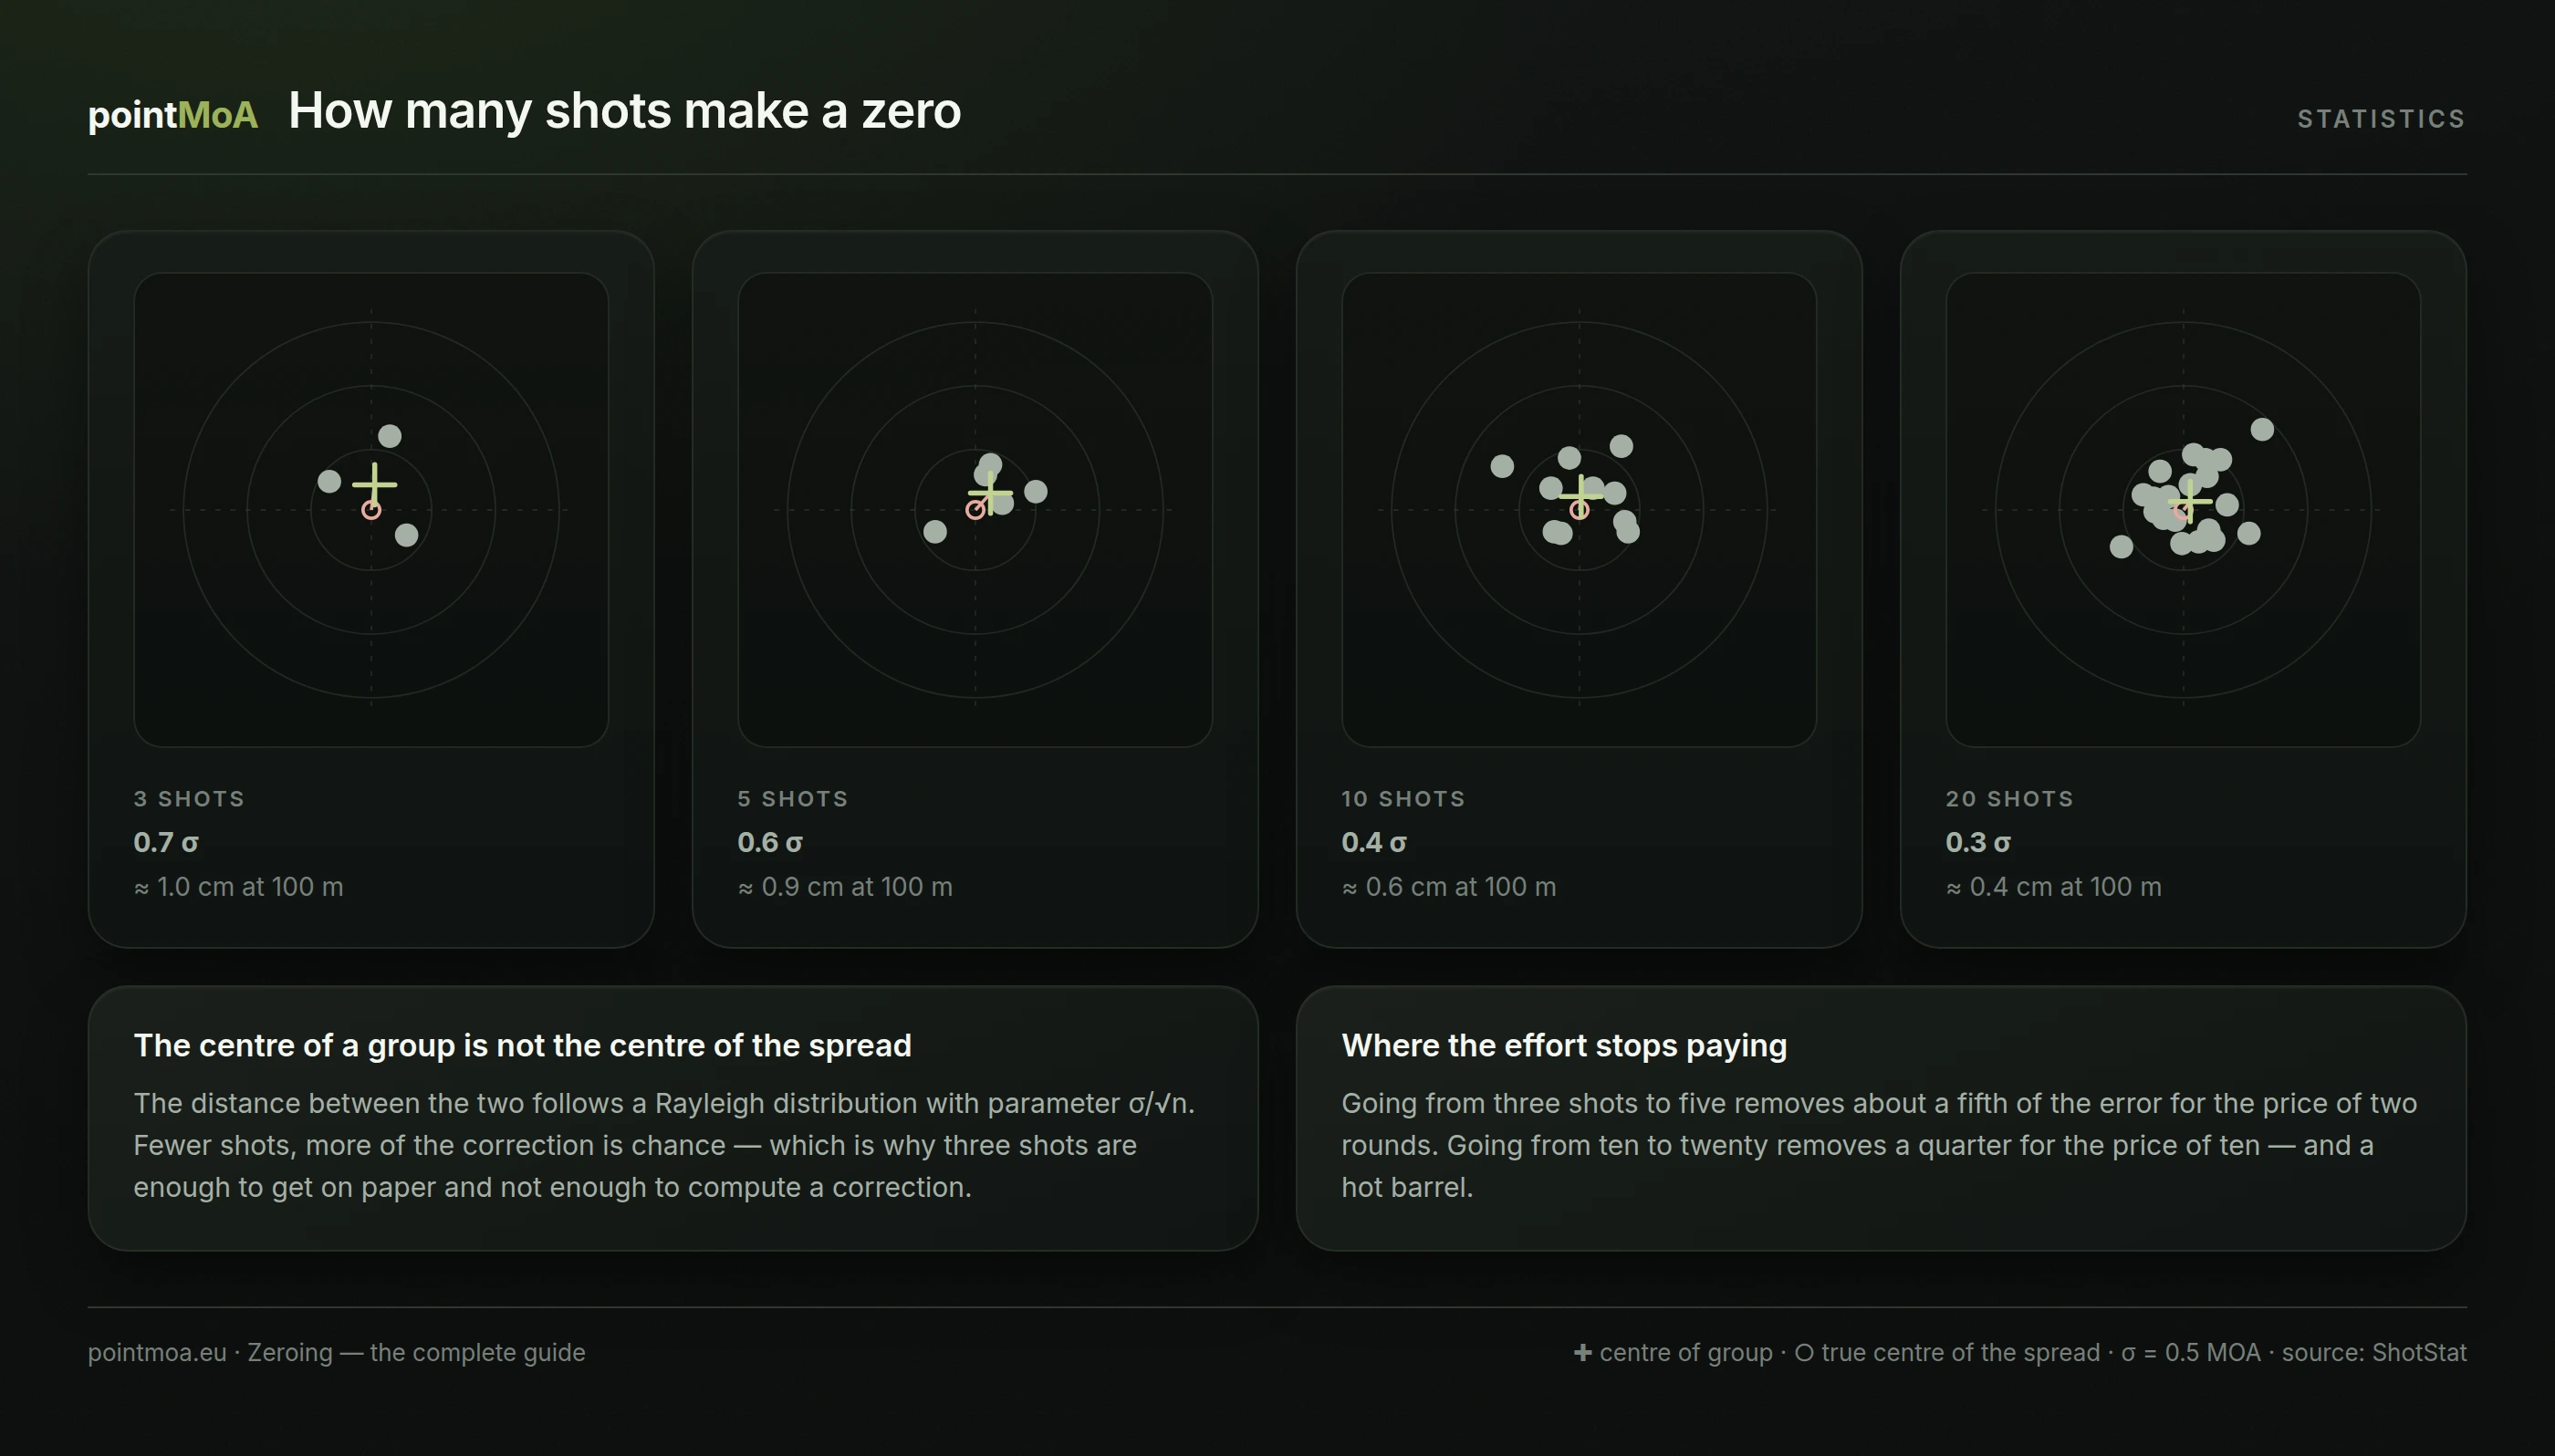
Two conclusions:
Three shots are not enough for a correction. Not because "three is a small sample" in some abstract sense, but because a correction computed from them largely corrects chance. The same analysis also shows that three-shot groups are inefficient as a measure of precision: reaching the same confidence as five-shot groups costs about 13 % more ammunition. Four-shot groups are only 3 % worse than five-shot ones.
Mind the distinction: this analysis is about the accuracy of the group centre, because that is what the zeroing correction depends on. How many shots it takes to judge the size of a group reliably is a different question with a different answer — see the guide to measuring groups.
Five shots are a sensible compromise, and ten is the choice if you care about a zero for long-range work. There is no point going higher for zeroing alone: the step from 10 to 20 shots removes only another quarter of the error, at the price of doubling the ammunition and heating the barrel.
So the practical division of labour is this: the first three-shot string exists only to get you on paper. The correction is computed from a string of five (or ten) shots fired at the same point of aim.
The procedure, step by step
1. Get on paper
Big target, short distance — 25 or 50 m. Three shots. If bore sighting already put the hits on the paper, this step is done.
A coarse correction at this stage may be computed from a single hit; only the order of magnitude matters, not the accuracy.
2. The real string
Move to the target distance (or to the range you are zeroing from — more on that shortly) and fire five shots at the same point of aim. Change nothing during the string.
3. Find the centre of the group
The centre of the group, not the centre of the best three and not the best shot. The simplest way without arithmetic: box the outermost holes with a rectangle whose sides are parallel to the target axes and take the centre of that rectangle. More accurately, take the mean of all the hole coordinates — vertical and horizontal separately.
Throwing out a "flier" is tempting and almost always wrong. If you know the shot was bad — because you felt the snatch — discard it at the moment you fire it, before you see where it landed. Discarding after the fact is picking data to fit a conclusion.
4. Compute the correction and dial it
Measure the distance from the centre of the group to the point of aim, vertically and horizontally. Convert it to clicks (next section) and dial the whole correction at once, not half of it.
If the turret has any backlash, tap the scope body lightly after dialling, or fire one settling shot before the confirmation string — a spring-loaded mechanism can take up its new position only under recoil.
5. Verify
Fire another five shots. Do not assume the correction worked — check. If the centre of the new group coincides with the point of aim within the rifle's own spread, the zero is done. If it does not, correct once more — again from a full string, not from a single shot.
Why not compute the correction from one shot
A single hit contains the entire dispersion — yours, the rifle's, the ammunition's and the conditions'. A correction computed from one shot therefore corrects mostly chance.
The result is predictable: the next shot lands on the other side, so you correct the other way, and round it goes. It is called chasing the point of impact, and it usually costs more ammunition than doing it properly the first time.
The correction: from centimetres to clicks
Turrets adjust an angle; a target shows centimetres. The conversion between the two always contains the distance:
clicks = offset [cm] ÷ click value at this distance [cm]
The click value at a distance follows from the angular unit of the turret:
| Turret | At 100 m | At 200 m | At 300 m |
|---|---|---|---|
| 0.1 MRAD | 1.00 cm | 2.00 cm | 3.00 cm |
| 0.2 MRAD | 2.00 cm | 4.00 cm | 6.00 cm |
| 1/4 MOA | 0.73 cm | 1.45 cm | 2.18 cm |
| 1/2 MOA | 1.45 cm | 2.91 cm | 4.36 cm |
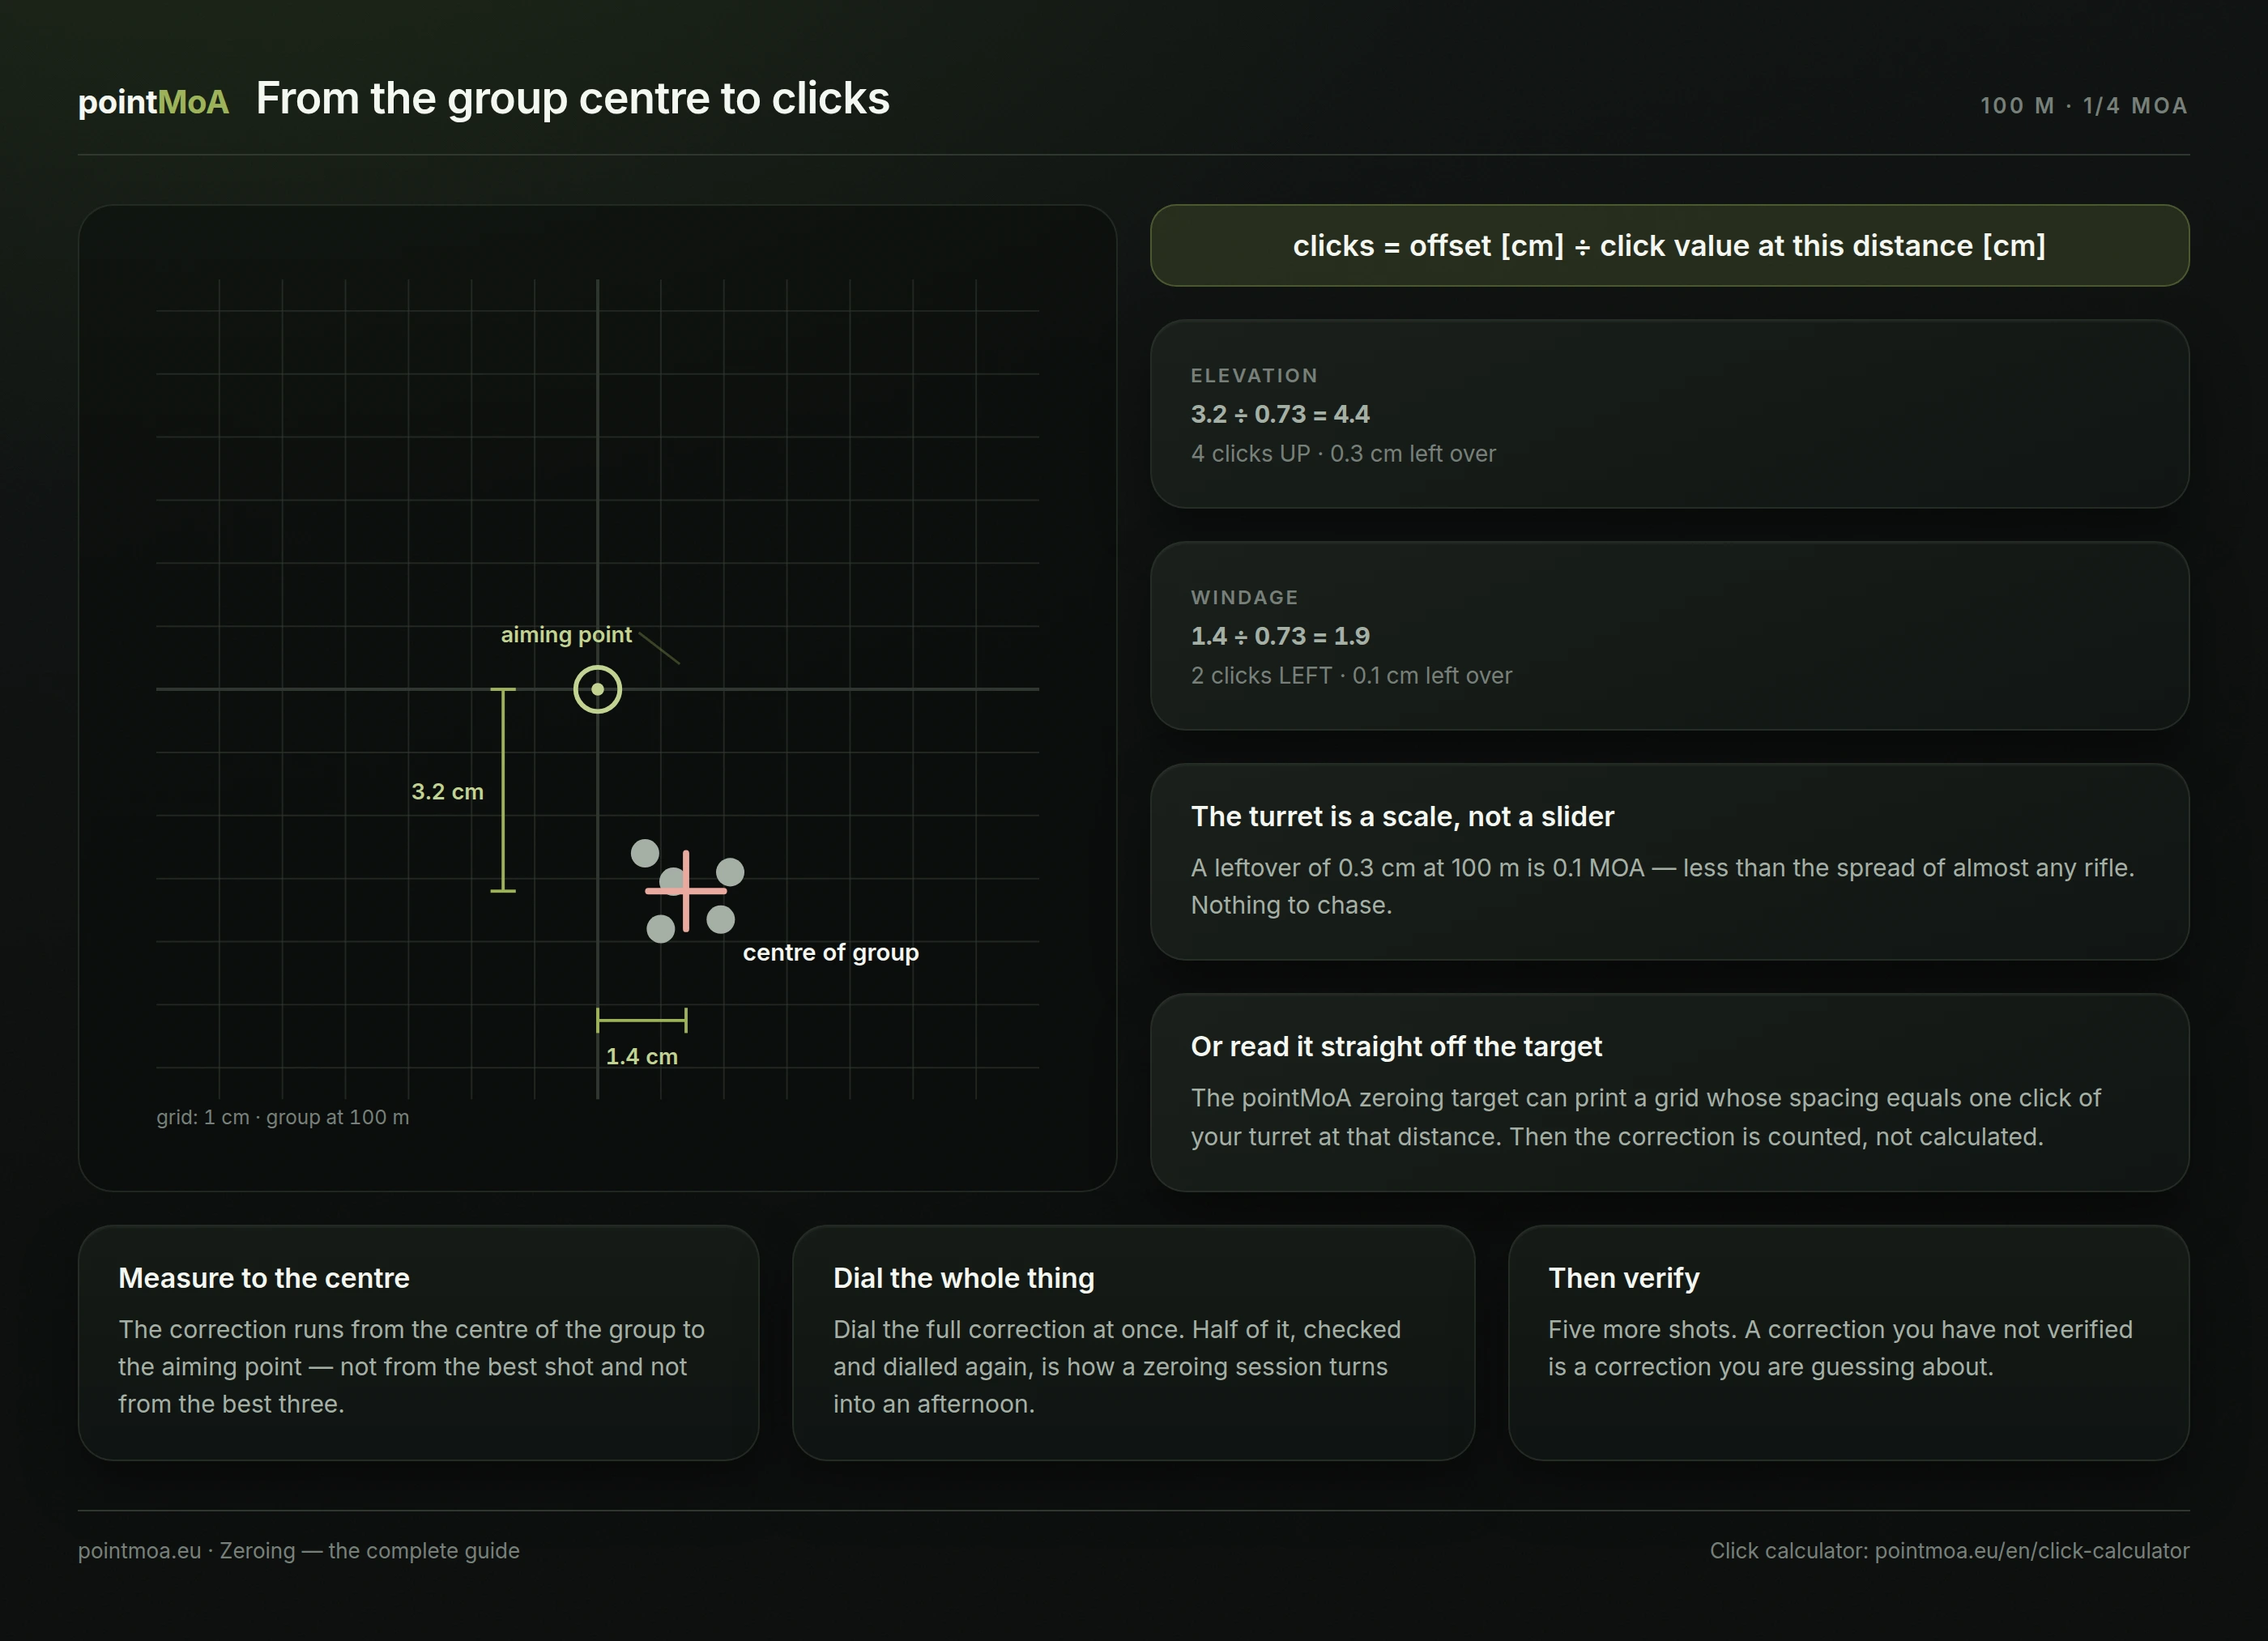
An example. You are zeroing at 100 m. The centre of the group sits 3.2 cm below and 1.4 cm to the right of the point of aim. The scope has 1/4 MOA turrets, that is 0.73 cm at 100 m.
- Elevation: 3.2 ÷ 0.73 = 4.4 → 4 clicks UP.
- Windage: 1.4 ÷ 0.73 = 1.9 → 2 clicks LEFT.
Note the leftovers: after four clicks of elevation there is still 0.3 cm missing. That is normal and there is nothing to chase — 0.3 cm at 100 m is 0.1 MOA, less than the spread of almost any rifle. A turret is a scale, not a continuous adjustment.
If you would rather not do the arithmetic at the target, the portal has a tool for it: the click calculator takes the offset in centimetres and the distance and returns the number of clicks for each turret, along with the direction and the residual error. If you are after the units themselves, start with MOA and MRAD — what they are and how to convert them to centimetres.
When the range is shorter than your target zero
This is the most common real-world problem: you want a zero at 200 or 300 m and you have a 25 or 50 m range to work with.
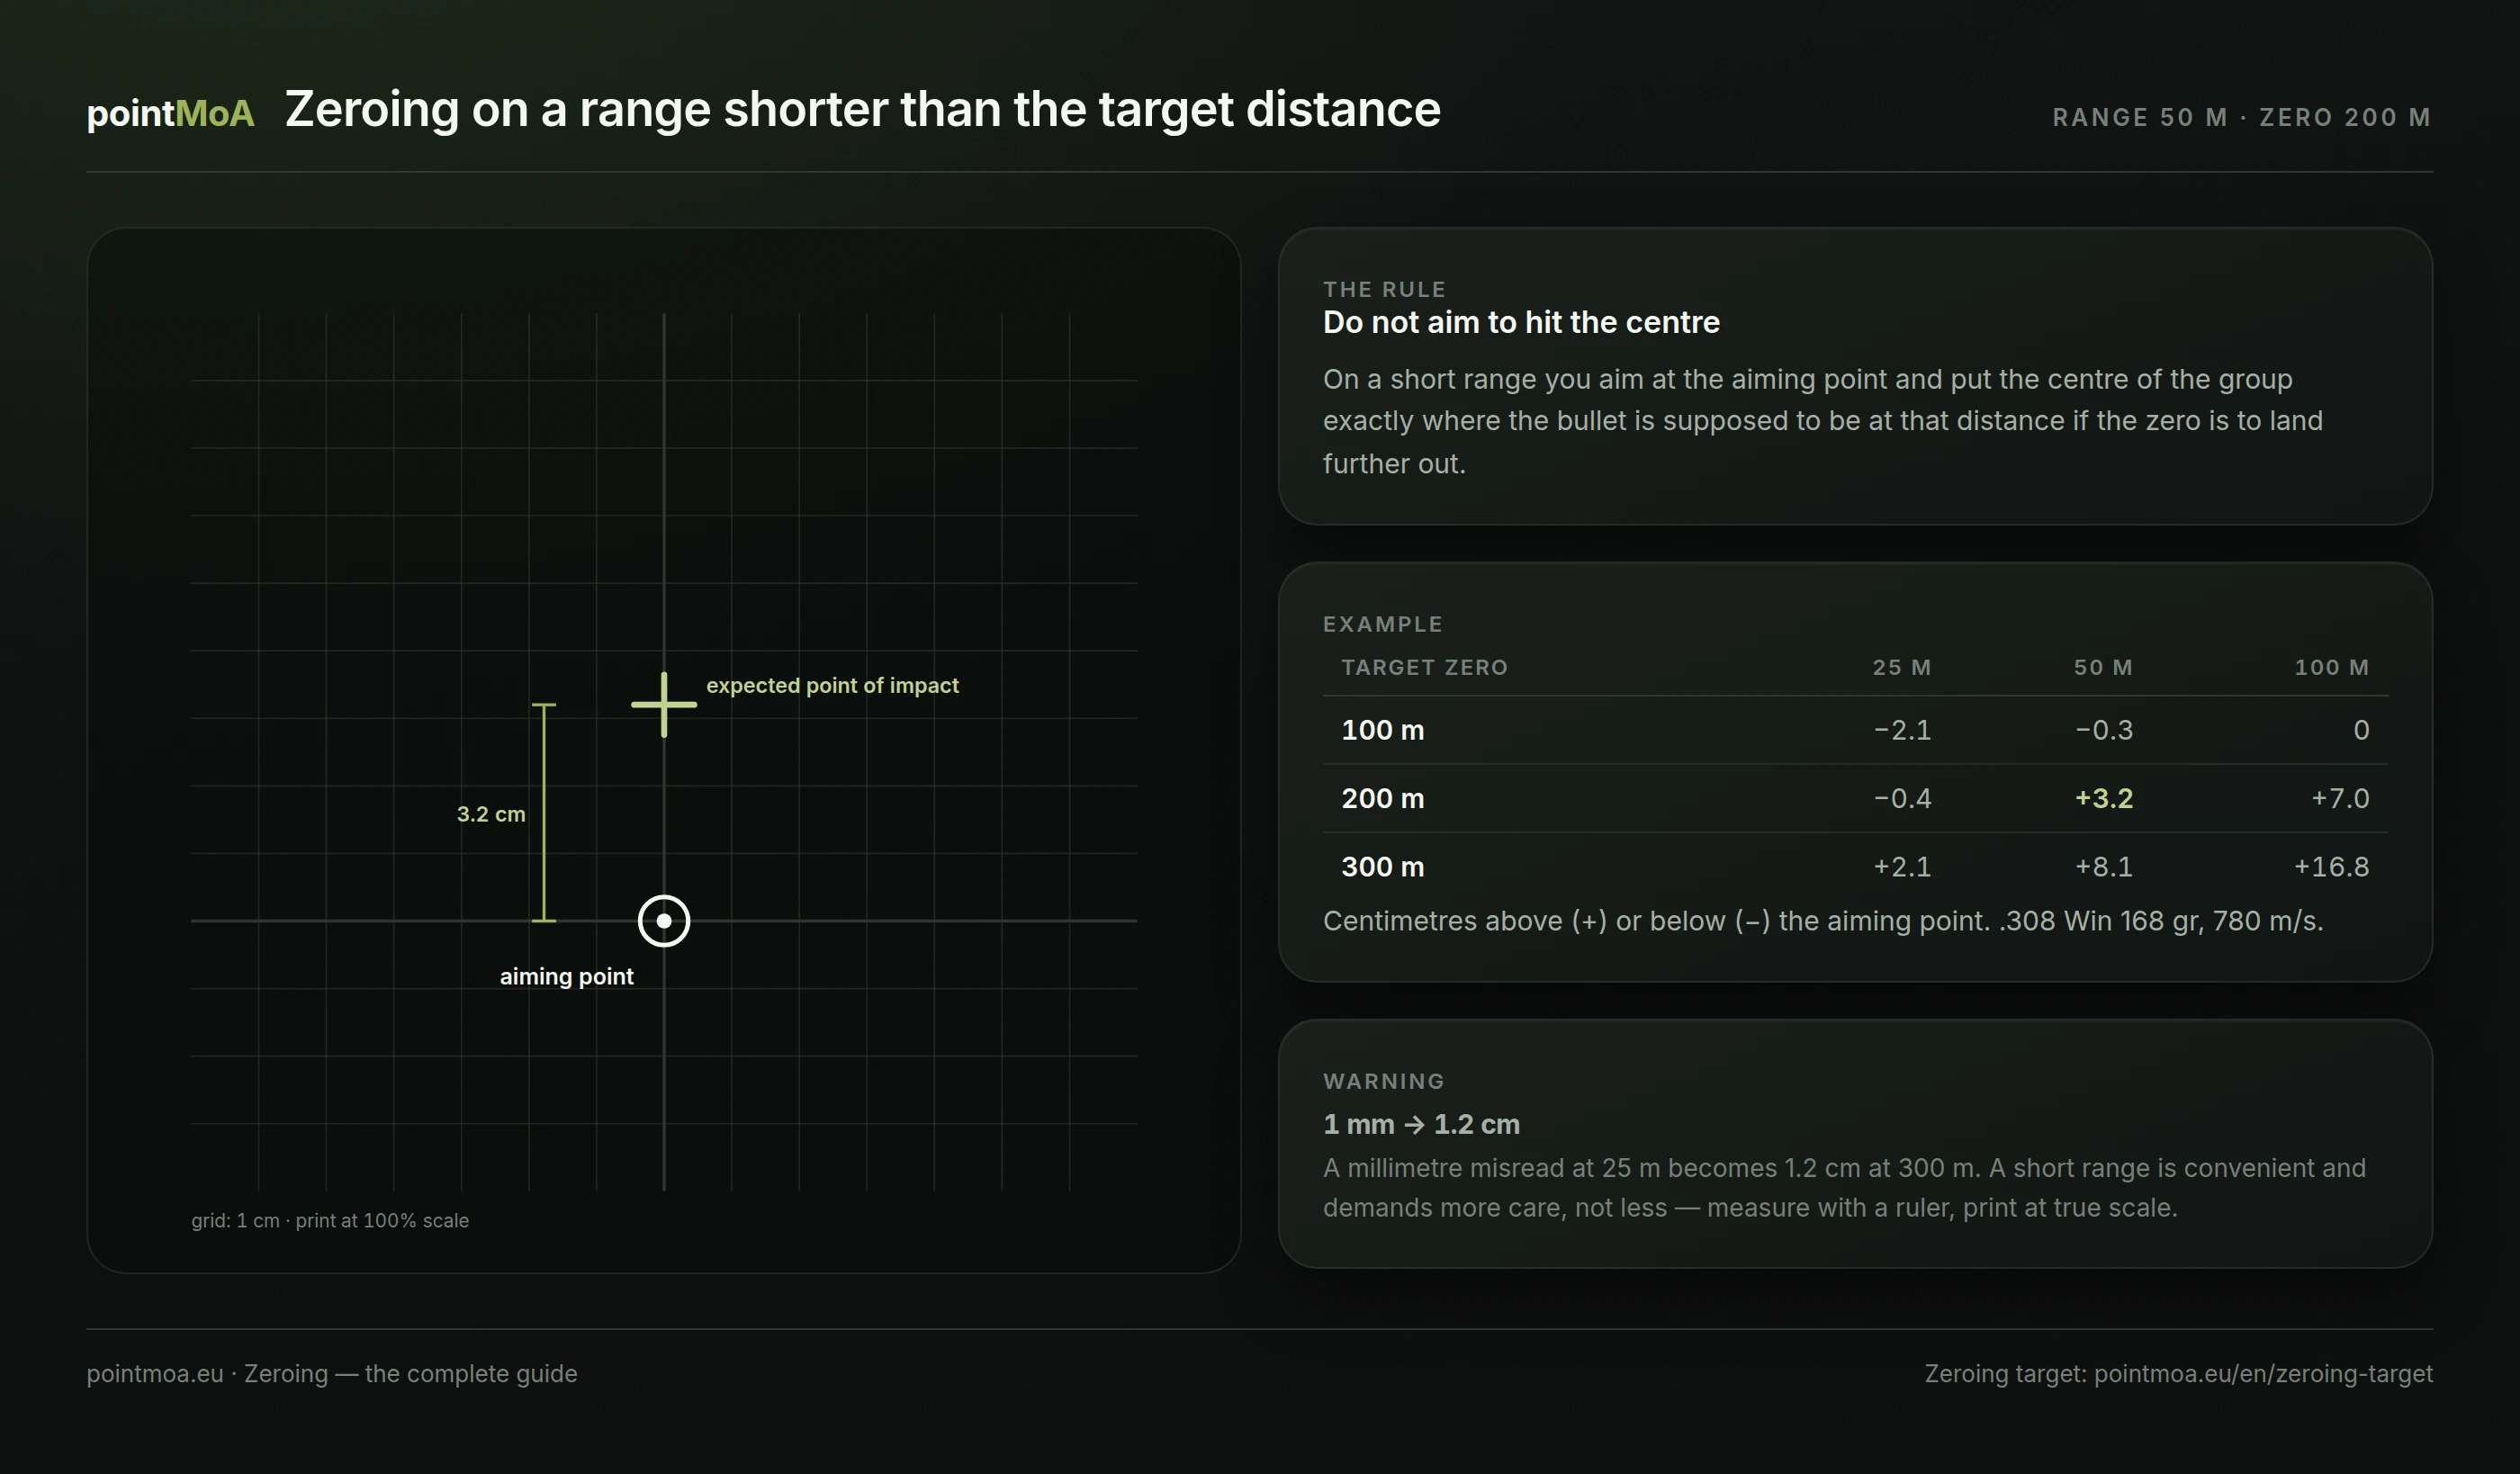
The answer is not to aim at the centre on the short range and hit the centre. It is to hit exactly where the bullet is supposed to be at that distance if the zero is to land further out.
The value comes straight from the bullet path. For the .308 168 gr from the table above:
| Target zero | 25 m range | 50 m range | 100 m range |
|---|---|---|---|
| 100 m | 2.1 cm below | 0.3 cm below | 0 |
| 200 m | 0.4 cm below | 3.2 cm above | 7.0 cm above |
| 300 m | 2.1 cm above | 8.1 cm above | 16.8 cm above |
So: for a 200 m zero on a 50 m range, you aim at the aiming point and put the centre of the group 3.2 cm above it. Not "roughly above" — 3.2 cm, measured.
Which brings back the warning from earlier: on a short range every millimetre of error is multiplied along with the distance. A millimetre misread at 25 m is 1.2 cm at 300 m. That is why this method calls for a ruler rather than an eyeball — and why the print has to hold true scale.
The pointMoA targets
The portal and the app have two tools that do exactly what is described above.
The zeroing target — for printing
The zeroing target takes the rifle's data (load, muzzle velocity, ballistic coefficient, sight height, target zeroing distance) and the distance of the range you are actually shooting on. The result is a sheet with:
- an aiming point and an expected point of impact, offset from each other by exactly what the bullet path gives at that range;
- a main grid — centimetre or inch — for plain measurement;
- an optional click grid whose spacing equals one click of your turret at that distance (0.1 MRAD, 0.2 MRAD, 1/4 MOA or 1/2 MOA). Then you read the correction off the target in clicks, without computing anything;
- control lines graduated every 10 mm, which you check with a ruler after printing to confirm the scale came out 1:1;
- a second page with the rifle's data — what was fired and in what conditions.
The sheet prints on A4, A3 or A2, at 100 % scale and with "fit to page" turned off. It is the same generator the pointMoA app uses — the sheet from the portal and the sheet from the phone are identical to the millimetre.
Two things worth flagging. First, do not measure the on-screen preview with a ruler — it is scaled to the width of the window. Second, if you want a run of identical targets for several rifles, switch on "sheet only, without the data page".
The interactive target — for understanding
The interactive target answers a different question: where the bullet lands on a particular target face at a particular distance, given a particular zero. You can choose the ISSF TS-2 target and true-scale silhouettes — 180 cm, an 80 cm half-figure and a 45 cm prone figure — the same ones the app uses.
It is the fastest way to see what the table says in numbers: with a 300 m zero, drag the distance slider and watch the impact travel high above the point of aim at 150 m and then fall below it at 400 m.
From the zero to the trajectory — the ballistic calculator
A zero is one point. The ballistic calculator turns it into a whole table. How it works, and what each input does to the answer, is covered separately in the calculator guide; what stays here is the part that touches zeroing.
The inputs that actually matter:
- muzzle velocity — the most important one and the one most often guessed. The catalogue figure was measured on the maker's barrel; yours is usually different. The portal's calculator can estimate it for your barrel length, but a chronograph measurement is worth more than any estimate;
- ballistic coefficient and model — G7 for sleek bullets, G1 for classic ones. Mixing the models is the most common source of a mismatch between the table and the target;
- sight height — without it, short range is computed wrong;
- zeroing distance — the one you actually set, not the one you meant to;
- conditions — pressure, temperature, humidity, wind.
Check the table before you trust it
A ballistic table is a model's prediction, not a measurement. Before you adopt it as yours, verify it at distance: zero the rifle, dial the correction the calculator gives for a chosen longer distance, and see where the shots actually land.
If the table asks for 4.2 MRAD and the hits only settle at 4.5 MRAD, that does not mean the calculator is broken — it means one of the inputs is not true. The standard approach, used among others in the Applied Ballistics programs, is to calibrate the muzzle velocity until the prediction matches the observed drop. Muzzle velocity and ballistic coefficient are the two hardest quantities to pin down in the whole calculation, and they are the ones most often pulled towards reality.
The scale of it: for our .308, a muzzle velocity difference of 780 → 740 m/s (that is 40 m/s, well within the range between lots or between summer and winter) does not change the 100 m zero at all, but at 300 m it moves the impact by 7 cm and at 500 m by 28 cm. The zero holds; the table drifts.
Verifying the scope itself
A separate question: does the turret deliver what it promises. The answer can be surprising — a scope can be a few per cent off, and on a large correction a few per cent is tens of centimetres.
The tall target test, described by Bryan Litz of Applied Ballistics, checks this directly. Draw a long, exactly vertical line with a scale on a target. Shoot at a point near the bottom, dial a known correction upwards — 30 MOA or 10 MRAD, say — and shoot again at the same point of aim. Divide the distance between the groups by the correction and compare with the theoretical value. If the scope gives 7 % more than it should, apply the inverse factor to your ballistic solution.
The test also checks the verticality of the adjustment: if the upper group drifted sideways, the turret axis is not parallel to the vertical of the target — which means the reticle is not level.
The box test checks the return to zero: dial up, right, down and left by the same amount, shooting along the way. If the last group does not return to the starting point, the mechanism does not hold its settings.
What moves a zero
Zeroing is not a one-off job. The things that change it, most common first:
- A change of ammunition lot or type. A different lot means a different muzzle velocity and often a different point of impact. Confirming the zero after a lot change is cheaper than one miss.
- Powder temperature. This, not air density, is the main culprit behind seasonal drift. The typical figure quoted for modern powders is about 0.5–0.8 m/s of muzzle velocity per degree Celsius, with ball powders noticeably more sensitive than extruded ones. For comparison: the change in air temperature alone from 15 °C to −10 °C moves the impact in our example by 1 cm at 300 m, while the resulting change in powder behaviour can move it several times more.
- Removing and refitting the optic. Even a quick-detach mount returns "almost" to the same place. "Almost" gets checked on a target.
- A suppressor. Fitting or removing one usually shifts the point of impact. A rifle with and without a can is, in practice, two zeros.
- Cheek weld and parallax. A different head position with the parallax not set is a different point of aim through the same reticle.
- Cant. As described above — it grows with distance and shows up as an "unexplained" lateral drift.
- Barrel condition. The first shot from a clean, cold barrel can land outside the group. If the rifle is going to be used cold, it is worth recording where that shot lands relative to the zero.
- Transport shocks. A rifle that rode loose in a car boot is entitled to come back with a different zero.
The most common mistakes
- Computing a correction from a single shot — and chasing the point of impact for half a day.
- Zeroing from a position with more spread than the rifle — that is, zeroing in your own error.
- Mixing units — a correction computed in MOA and dialled on a MRAD turret. If the scope is MRAD, keep everything in MRAD.
- Zeroing on one lot of ammunition and shooting another.
- Correcting mid-string — after which the centre of the group can no longer be determined.
- Turning the wrong way. The marking on the turret (UP, R) says which way the point of impact will move, not which way the group deviated. Group low → turn towards UP.
- Printing the target "fit to page" — all the work then rests on a grid with no true scale.
- Calling the zero done without a confirmation string.
Write the result down
This is the step that pays off the first time you change equipment or ammunition. Worth recording:
- the date, the place, the zeroing distance and the range distance if it was different;
- the rifle, the barrel and its length, the mount;
- the ammunition: maker, name, bullet weight and lot number;
- the muzzle velocity if it was measured, and with what;
- the conditions: temperature, pressure, wind;
- the number and direction of clicks relative to the previous setting;
- the size of the confirmation group.
Without it, the next change starts from zero — literally. This is exactly the kind of note the shooter's logbook in the pointMoA app was built for.
Checklist
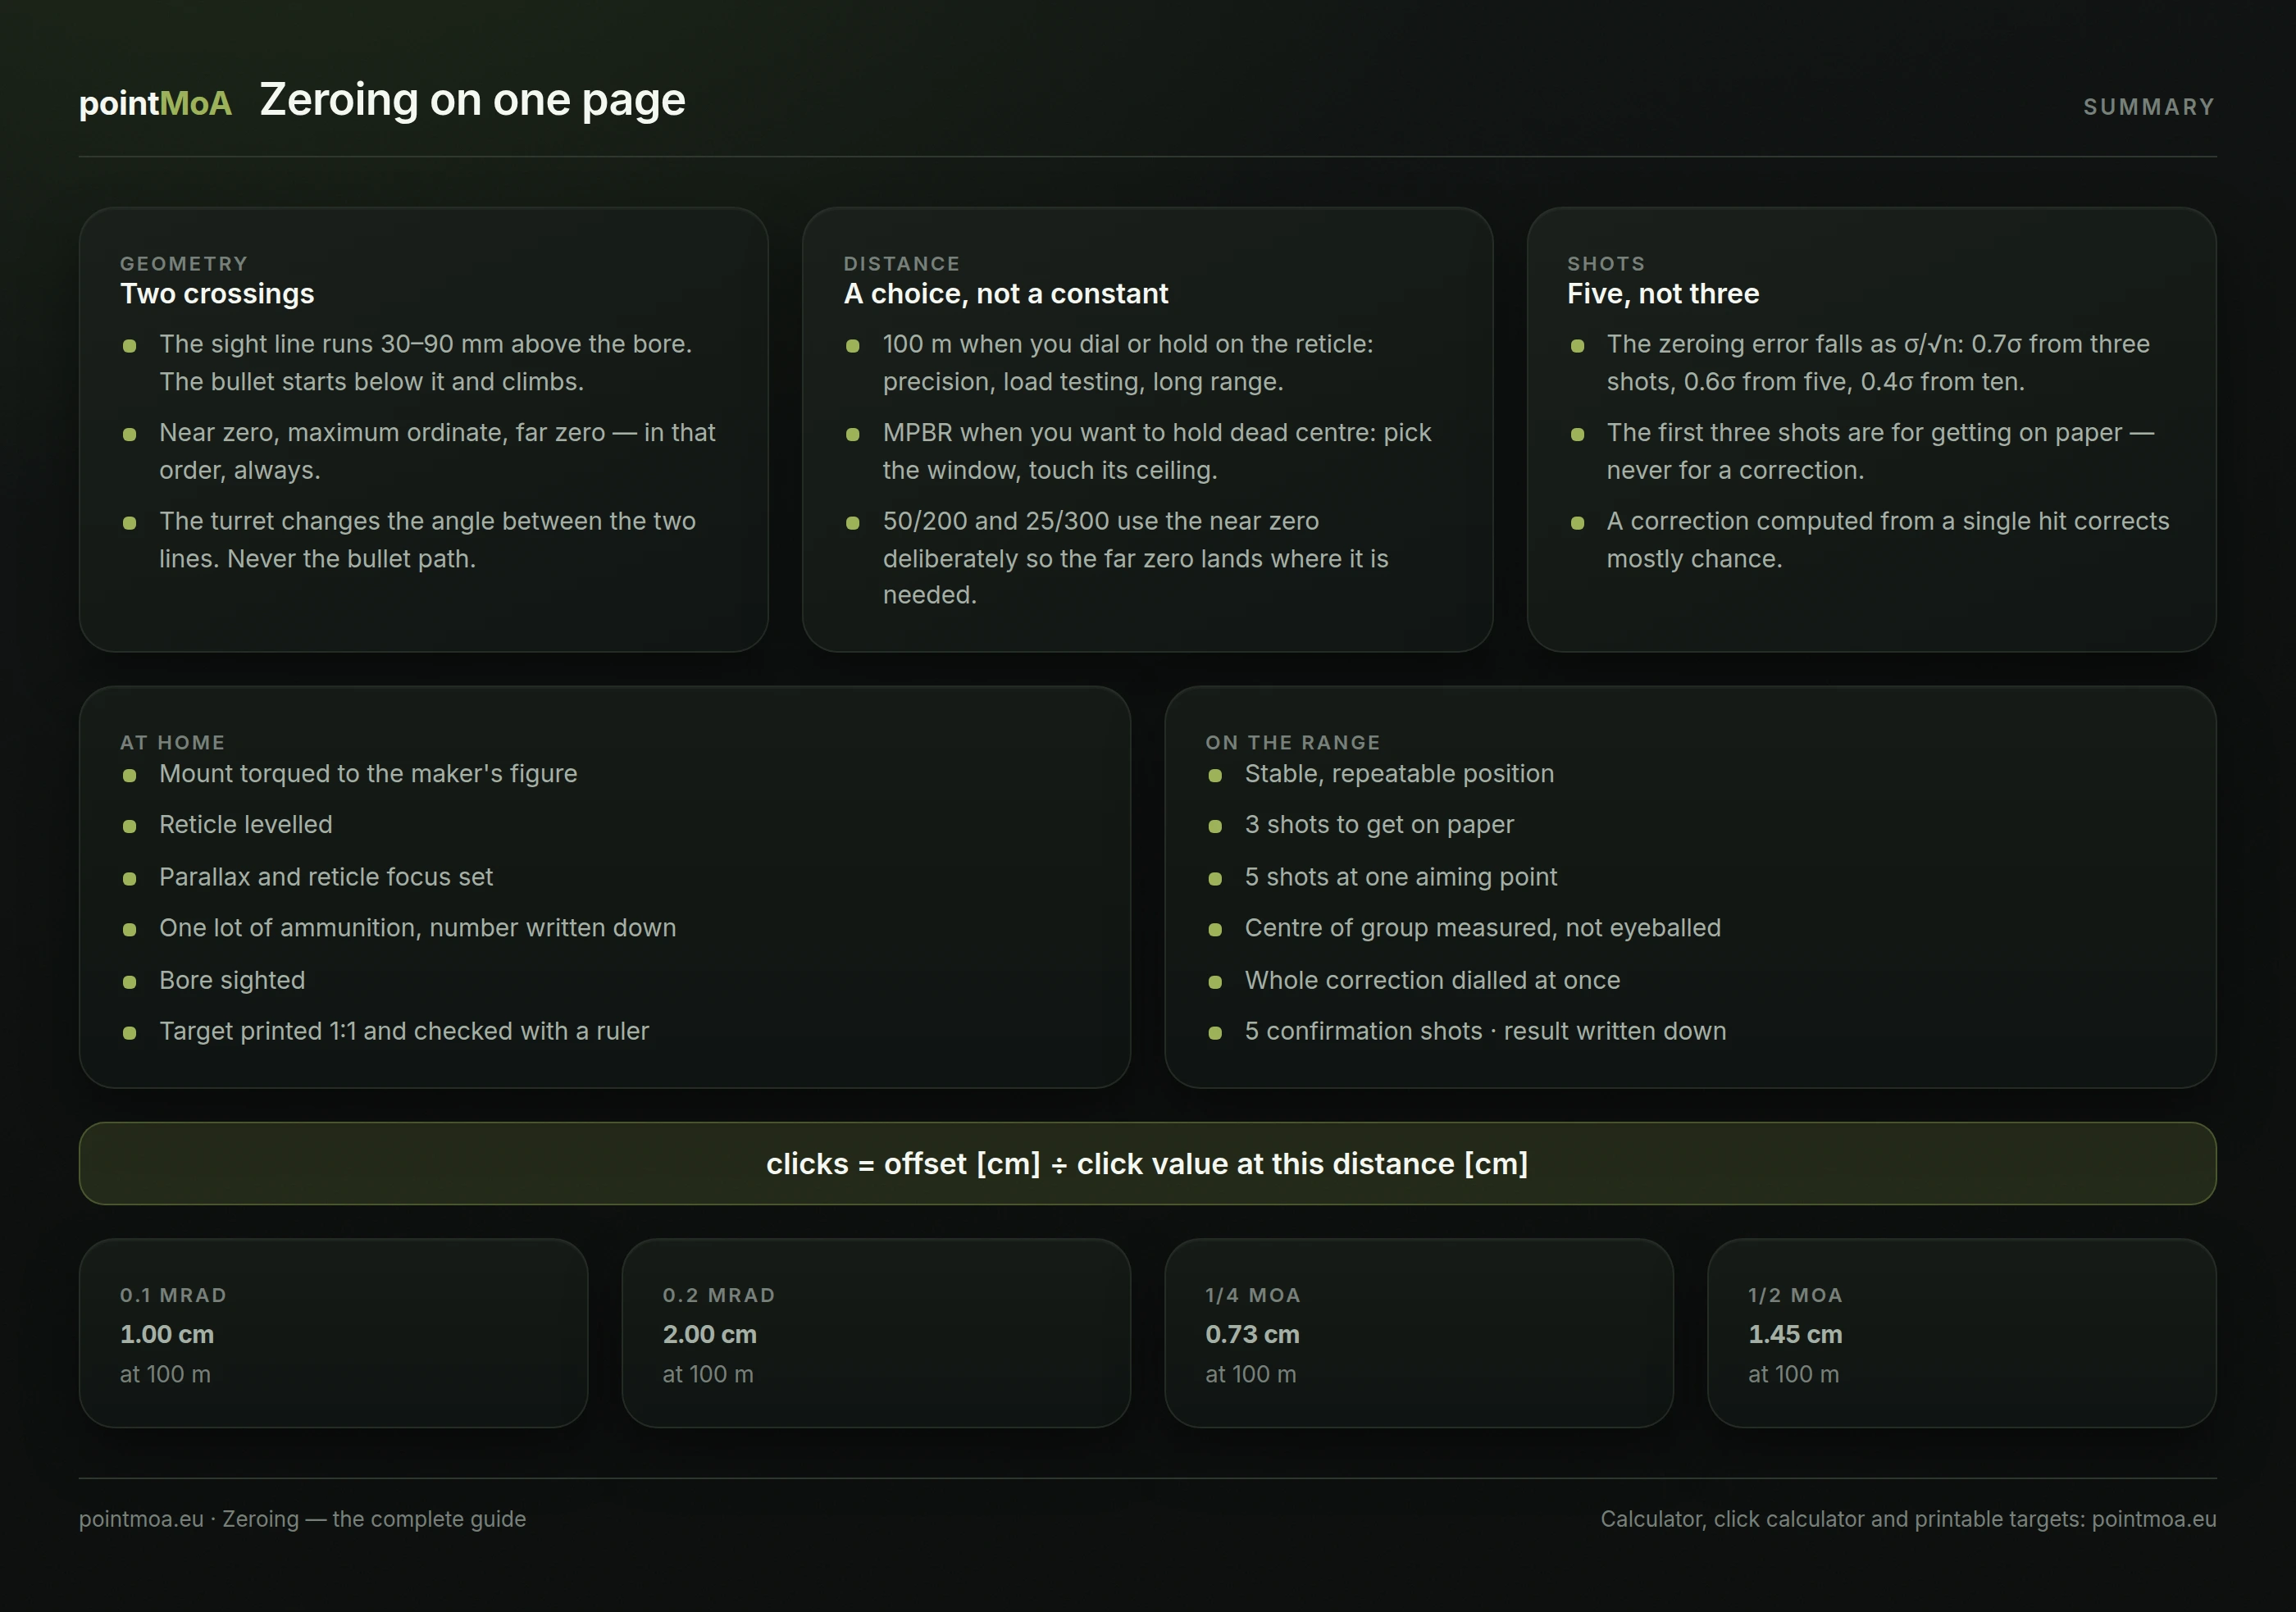
At home: torque figures checked → reticle levelled → parallax and reticle focus set → one lot of ammunition prepared → bore sighted → target printed at 1:1 and checked with a ruler.
On the range: stable position → 3 shots to get on paper → 5 shots at one point of aim → centre of group determined → correction computed and dialled in full → 5 confirmation shots → result written down.
Sources
- TC 3-22.9 Rifle and Carbine — the 25 m zeroing procedure with the 300 m sight setting, US Army.
- ShotStat / Ballistipedia — FAQ and Closed Form Precision — the distribution of a sighting group's centre (σ/√n) and the efficiency of groups of different sizes.
- Applied Ballistics — Ballistic Calibration — calibrating a ballistic solution against observed drop.
- Bryan Litz, Scope Tracking: Tall Target Test — verifying the true click value and the verticality of the adjustment.
- PrecisionRifleBlog — Precision & Group Size: Statistics for Shooters — why extreme spread grows with the number of shots.
- Handloader — Rifle Powder Temperature Sensitivity — how sensitive powders are to temperature.
The trajectory values in the tables were computed with the pointMoA ballistic engine — the same one behind the calculator and the app. You can reproduce them by entering the inputs given above.